
Los Angeles, CA * Webmaster@ADefWebserver.com |
|
Los Angeles, CA * Webmaster@ADefWebserver.com |
Use a ListView to implement grouping |
|
|
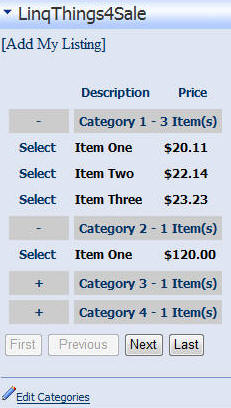
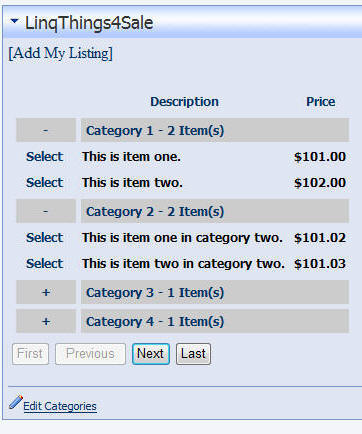
The task presented in this section of the tutorial is to create a ListView
that groups items by category. This is done with two ListViews. The "outer" ListView shows each category while the "inner" ListView shows the items for each category. A panel control hides the items for each category until the "+" is clicked. |
 |
Create the "grouping" LinqDataSource |
|
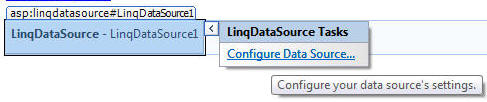
| Drag the LinqDataSource control to the design surface of the View.ascx page. Click on the options (right-arrow on the right side of the control) and select Configure Data Source. |
 |
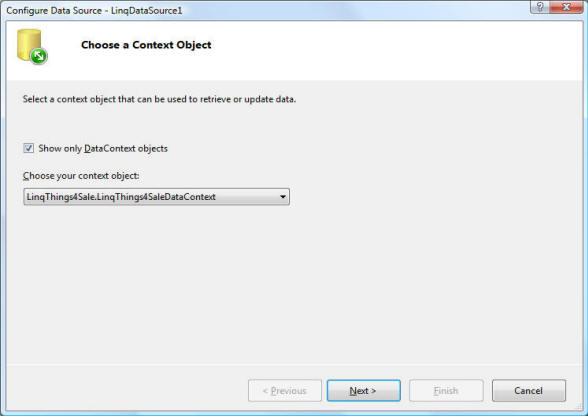
| In the Configure Data Source box, select LinqThings4Sale.LinqThings4SaleDataContext in the drop-down and click the Next button. |
 |
|
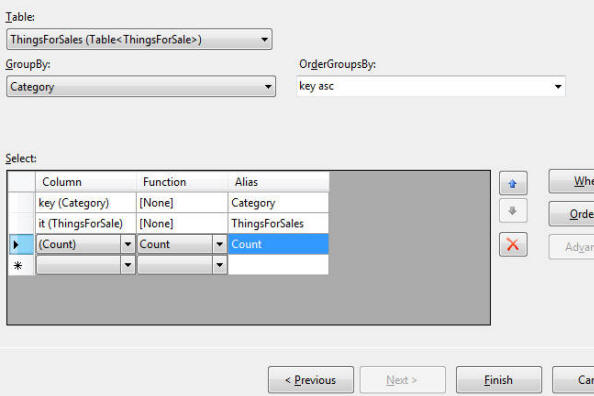
The Configure Data Selection screen will show.
|
 |
| Click the Where button. |  |
|
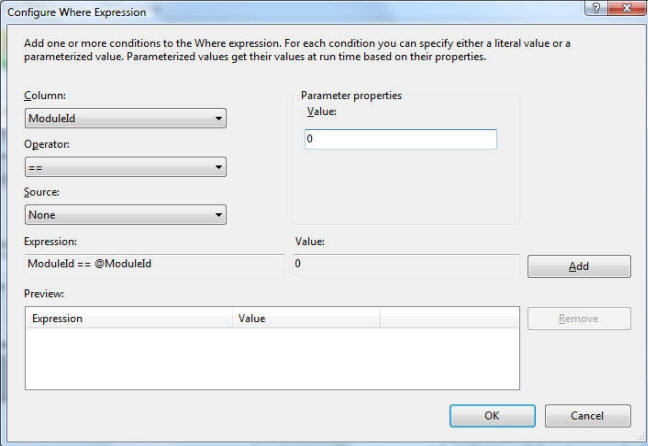
On the Configure Where Expression screen:
Click the Add button. Click the OK button.Click the Finish button. |
 |
|
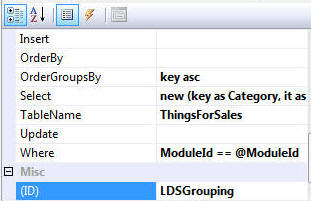
In the properties for the LinqDataSource control, rename the ID to LDSGrouping. |
 |
|
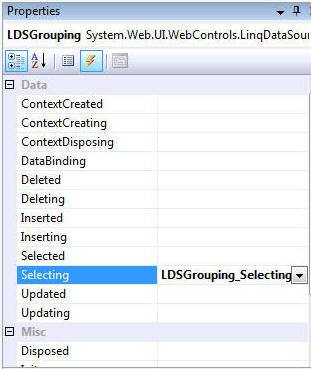
In the events for the LinqDataSource control enter LDSGrouping_Selecting for Selecting. |
 |
Create the ListView |
|
|
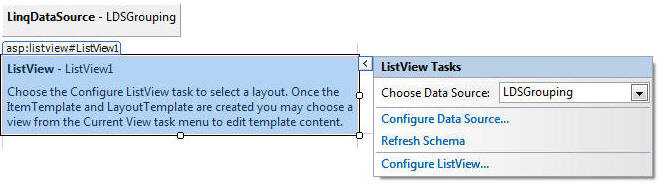
Drag a ListView control from the Toolbox and place it under
the LinqDataSource control. On the options for the ListView control, select LDSGrouping from the Choose Data Source drop-down. |
 |
|
Switch to source view and replace: <asp:ListView ID="ListView1" runat="server" DataSourceID="LDSGrouping"> </asp:ListView> |
|
| With: | |
|
<asp:ListView ID="LVGroup" runat="server" DataSourceID="LDSGrouping"
OnItemDataBound="LVGroup_ItemDataBound"> <LayoutTemplate> <table runat="server"> <tr runat="server"> <td runat="server"> <table id="itemPlaceholderContainer" runat="server" border="0" style="" class="ModuleTitle_MenuItem" cellpadding="5" cellspacing="5"> <tr id="Tr1" runat="server" style=""> <th id="Th1" runat="server"> </th> <th id="Th6" runat="server"> Description </th> <th id="Th7" runat="server"> Price </th> </tr> <tr id="itemPlaceholder" runat="server"> </tr> </table> </td> </tr> <tr runat="server"> <td runat="server" style=""> <asp:DataPager ID="DataPager1" runat="server" PageSize="4"> <Fields> <asp:NextPreviousPagerField ButtonType="Button" ShowFirstPageButton="True" ShowLastPageButton="True" /> </Fields> </asp:DataPager> </td> </tr> </table> </LayoutTemplate> <ItemTemplate> <tr id="row" runat="server" class="group"> <th colspan="1" width="50px" align="center" bgcolor="#CCCCCC"> <asp:LinkButton ID="MinMax" runat="server" OnClick="MinMax_Click" Text="+" CommandArgument='<%# Eval("Category") %>'></asp:LinkButton> </th> <th colspan="6" align="left" bgcolor="#CCCCCC"> <b> <%# Eval("Category")%></b> - <%# Eval("Count") %> Item(s) </th> </tr> <asp:Panel ID="pnlItems" runat="server" Visible="false"> <asp:ListView ID="lvItems" runat="server" OnItemDataBound="lvItems_ItemDataBound" DataSource='<%# Eval("ThingsForSales") %>'> <LayoutTemplate> <tr runat="server" id="itemPlaceholder" /> </LayoutTemplate> <ItemTemplate> <tr style=""> <td align="center"> <asp:LinkButton ID="lnkSelect" runat="server" OnClick="lnkSelect_Click" CommandName='<%# Eval("ID") %>' CommandArgument='<%# Eval("UserID") %>'>Select</asp:LinkButton> </td> <td> <asp:Label ID="DescriptionLabel" runat="server" Text='<%# Eval("Description") %>' /> </td> <td> <asp:Label ID="PriceLabel" runat="server" Text='<%# Eval("Price", "{0:c}") %>' /> </td> </tr> </ItemTemplate> </asp:ListView> </asp:Panel> </ItemTemplate> </asp:ListView> |
|
| Switch back to design view and the grid will resemble the image to the right. |
 |
The ListView Explained |
|
|
See this article for an excellent overview of the ListView
control: http://msdn2.microsoft.com/en-us/library/bb398790.aspx |
|
|
In this example the ListView contains a template (between
the <LayoutTemplate> and </LayoutTemplate>
tags). This determines the design of the control. The LayoutTemplate also contains a DataPager that displays the paging buttons. The remaining part of the control is in the ItemTemplate (between the <ItemTemplate> and </ItemTemplate> tags). |
|
|
Inside the ItemTemplate another ListView control is defined. It's DataSource is set to Eval("ThingsForSales") which represents the items for each category. |
|
|
< asp:Panel ID="pnlItems" runat="server" Visible="false"><asp:ListView ID="lvItems" runat="server" OnItemDataBound="lvItems_ItemDataBound" DataSource='<%# Eval("ThingsForSales") %>'> <LayoutTemplate> <tr runat="server" id="itemPlaceholder" /> </LayoutTemplate> <ItemTemplate> <tr style=""> <td align="center"> <asp:LinkButton ID="lnkSelect" runat="server" OnClick="lnkSelect_Click" CommandName='<%# Eval("ID") %>' CommandArgument='<%# Eval("UserID") %>'>Select</asp:LinkButton> </td> <td> <asp:Label ID="DescriptionLabel" runat="server" Text='<%# Eval("Description") %>' /> </td> <td> <asp:Label ID="PriceLabel" runat="server" Text='<%# Eval("Price", "{0:c}") %>' /> </td> </tr> </ItemTemplate> </asp:ListView> </asp:Panel> |
|
| The ListView is contained inside a Panel control (pnlItems) that will hide and show the ListView. | |
The Code behind |
|
| Open the View.ascx.cs file and add the following code: | |
|
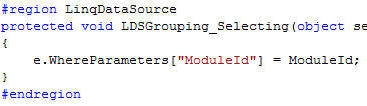
#region LinqDataSource protected void LDSGrouping_Selecting(object sender, LinqDataSourceSelectEventArgs e) { e.WhereParameters["ModuleId"] = ModuleId; } #endregion |
 |
|
This code inserts the current ModuleId parameter so that the
LinqDataSource control only displays data for the current module
instance. Add the following code: |
|
|
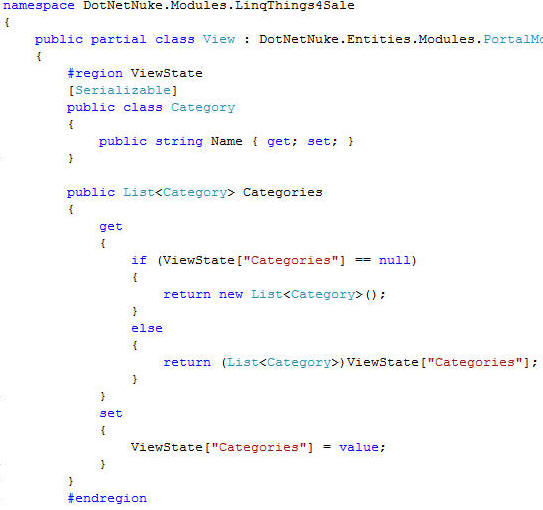
#region ViewState [Serializable] public class Category { public string Name { get; set; } } public List<Category> Categories { get { if (ViewState["Categories"] == null) { return new List<Category>(); } else { return (List<Category>)ViewState["Categories"]; } } set { ViewState["Categories"] = value; } } #endregion |
 |
|
This code exposes a Categories property that will be used to hold the categories that should be displayed in the "expanded" state. Categories that should be expanded are added to the list. Categories that should be "rolled up" are removed from the list. |
|
|
Add the following code: |
|
|
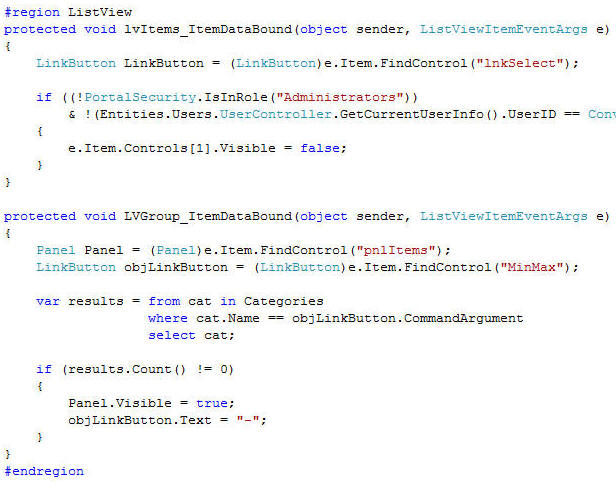
#region ListView protected void lvItems_ItemDataBound(object sender, ListViewItemEventArgs e) { LinkButton LinkButton = (LinkButton)e.Item.FindControl("lnkSelect"); if ((!PortalSecurity.IsInRole("Administrators")) & !(Entities.Users.UserController.GetCurrentUserInfo().UserID == Convert.ToInt16(LinkButton.CommandArgument))) { e.Item.Controls[1].Visible = false; } } protected void LVGroup_ItemDataBound(object sender, ListViewItemEventArgs e) { Panel Panel = (Panel)e.Item.FindControl("pnlItems"); LinkButton objLinkButton = (LinkButton)e.Item.FindControl("MinMax"); var results = from cat in Categories where cat.Name == objLinkButton.CommandArgument select cat; if (results.Count() != 0) { Panel.Visible = true; objLinkButton.Text = "-"; } } #endregion |
 |
|
This code adds two methods that fire each time a record is bound to each of
the ListViews. lvItems_ItemDataBound determines if the item belongs to the current user or if the current user is an Administrator. If either of these is true then the Select link for the record is made visible. LVGroup_ItemDataBound determines if the category for the current record is in the Categories list. If it is then the panel control is made visible and the "+" is changed to a "-". Add the following code: |
|
|
#region MinMax protected void MinMax_Click(object sender, EventArgs e) { LinkButton objLinkButton = (LinkButton)sender; var results = from cat in Categories where cat.Name == objLinkButton.CommandArgument select cat; if (objLinkButton.Text == "+") { // Only add this category if it does not already exist if (results.Count() == 0) { // Add the Category Category objCategory = new Category { Name = objLinkButton.CommandArgument }; List<Category> colCategories = Categories; colCategories.Add(objCategory); Categories = colCategories; } } else { // Only remove this category if it already exists if (results.Count() != 0) { // Remove the Category List<Category> colCategories = Categories; Category objCategory = (Category)colCategories.FirstOrDefault(c => c.Name == objLinkButton.CommandArgument); colCategories.Remove(objCategory); Categories = colCategories; } } LVGroup.DataBind(); } #endregion |
 |
|
This code adds the category to the Categories list (stored in view state) if the link CommandArgument is set to "+". It removes the category from the Categories list if the link CommandArgument is set to "-". Add the following code: |
|
|
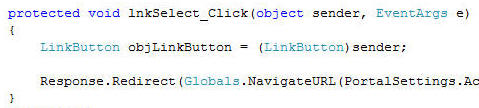
protected void lnkSelect_Click(object sender, EventArgs e) { LinkButton objLinkButton = (LinkButton)sender; Response.Redirect(Globals.NavigateURL(PortalSettings.ActiveTab.TabID, "EditItem", "mid=" + ModuleId.ToString(), "RecordID=" + objLinkButton.CommandName)); } |
 |
|
This code fires when the Select link is clicked for an item and navigates to
the
edit page. |
|
|
Save the file. From the Toolbar, select Build
then Build Page. The page should build without errors. The module is complete. |
 |
Back to: Creating a DotNetNuke® Module using LINQ to SQL For absolute beginners! Part 3
DotNetNuke® is a registered trademark of the DotNetNuke Corporation