Live example is here:
http://dnnsilverlight.adefwebserver.com/Silverlight30/WCFRIAServices/tabid/83/Default.aspx
As of this writing, WCF RIA Services is still in beta. however, in it's current form, it clearly demonstrates that it allows dramatic reductions in development time. This is accomplished by providing a framework that greatly reduces the amount of code needed to communicate between a Silverlight application and the web server hosting it.
This tutorial will demonstrate creating a simple module that will allow each registered user of a DotNetNuke website to create and edit their own Task list. This tutorial will also cover two important issues that are of interest to DotNetNuke module developers; implementing WCF RIA Services in a non WAP website, and securing and segmenting data for website users.
Note, major thanks and credit goes to Ian Lackey for working out exactly how to make WCF RIA services work with a WSP website. Without his help this tutorial would not have been possible.
![]()
Open your DotNetNuke website in Visual Studio using File then Open (note: the reason we are developing the module by running DotNetNuke inside of Visual Studio, is that as of this writing, there is a bug in WCF RIA Services that does not allow it to work if it is running on a website that is configured to use more than one host header. The web server in Visual Studio only uses one host header so you will not get this error. You can find information on a workaround for the bug at this link).
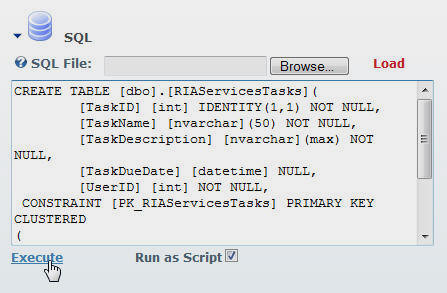
Click F5 in Visual Studio to launch your DotNetNuke website. Log into your site as the Host account. From the Host menu, select SQL. Paste the following script in the SQL box and click Execute:
CREATE TABLE [dbo].[RIAServicesTasks](
    [TaskID] [int] IDENTITY(1,1) NOT NULL,
    [TaskName] [nvarchar](50) NOT NULL,
    [TaskDescription] [nvarchar](max) NOT NULL,
    [TaskDueDate] [datetime] NULL,
    [UserID] [int] NOT NULL,
 CONSTRAINT [PK_RIAServicesTasks] PRIMARY KEY CLUSTERED
(
    [TaskID] ASC
)WITH (PAD_INDEX  = OFF, STATISTICS_NORECOMPUTE  = OFF,
IGNORE_DUP_KEY = OFF, ALLOW_ROW_LOCKS  = ON, ALLOW_PAGE_LOCKS  = ON) ON [PRIMARY]
) ON [PRIMARY]
In Visual Studio, use Shift+F5 to stop debugging.
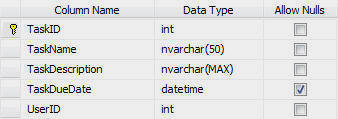
We have created a table, RIAServicesTasks, that will hold the data for the application.
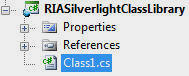
In the following steps we will add two projects to our Visual Studio solution, a RIA Services Domain and a RIA Services Library. The two projects will be linked together. The RIA Services Domain project will be directly consumed by the DotNetNuke website, and the RIA Services Library will be directly consumed by the Silverlight project (that will be created in a later step).
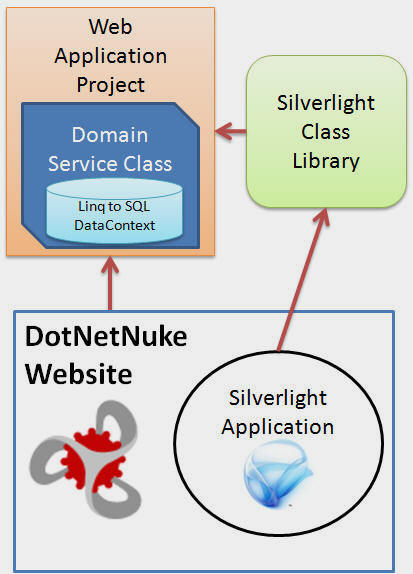
The RIA Services Domain consists of a Domain Service Class that is connected to the Linq to SQL DataContext that connects to the RIAServicesTasks table. It resides in a Web Application Project. A Silverlight Class Library project is created only to link the Silverlight Application to the Domain Service Class. Finally, the DotNetNuke website launches the Silverlight Application and provides access to the live data through a reference to the Domain Service Class.
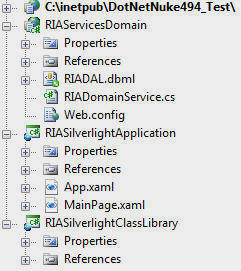
The picture above shows what the completed project will look like (your DotNetNuke project will probably have a different name)
The Domain Service Class will reside in a Web Application Project because at the time of this writing, a Domain Service Class cannot reside directly in a Web Site Project website.
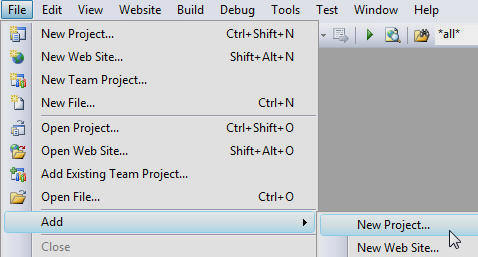
In Visual Studio, select File, then Add, then New Project...
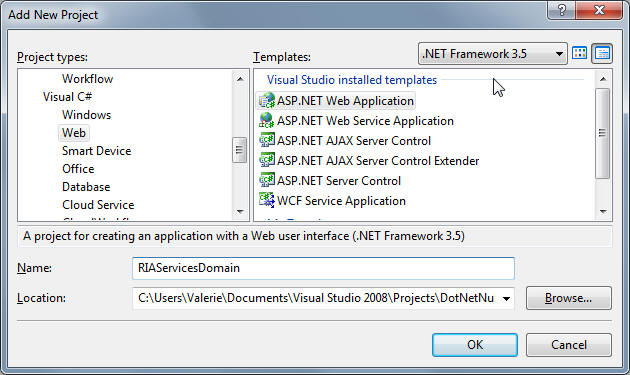
Create a new ASP.NET Web Application. Name it RIAServicesDomain.
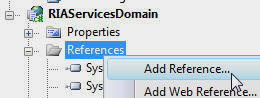
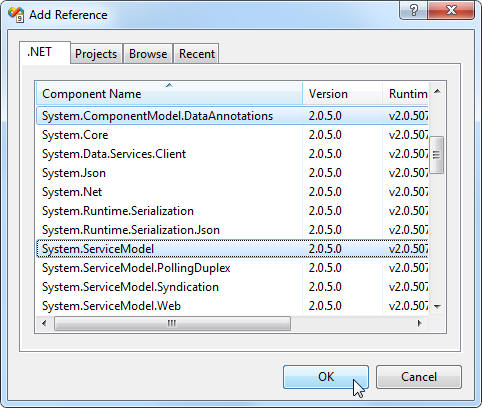
Right-click on the References folder of the RIAServicesDomain project and select Add Reference...
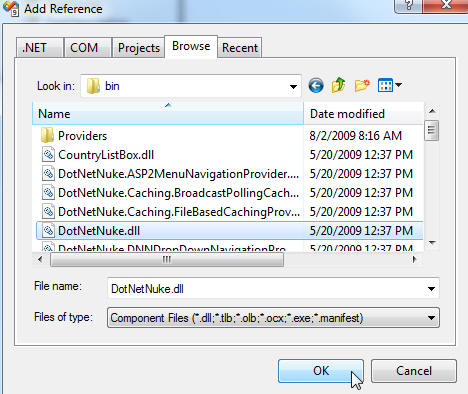
Click the Browse tab and browse to the "bin" directory of the DotNetNuke website, and select the DotNetNuke.dll assembly and click OK.
This will allow the project to call DotNetNuke core methods, such as retrieving the UserId of the currently logged in user.
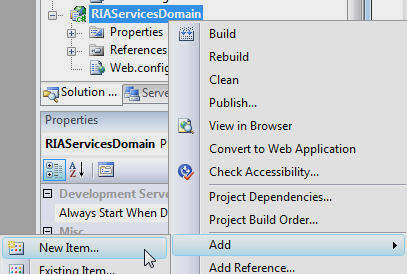
Delete the App_Data folder and the Default.aspx page.

Copy the connection string from the Web.config file in the DotNetNuke website and place it in the Web.config file in the RIAServicesDomain project. Save and close the Web.config file.
When the Linq to SQL class is created, it will reference this connection string.
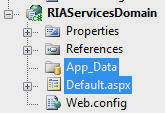
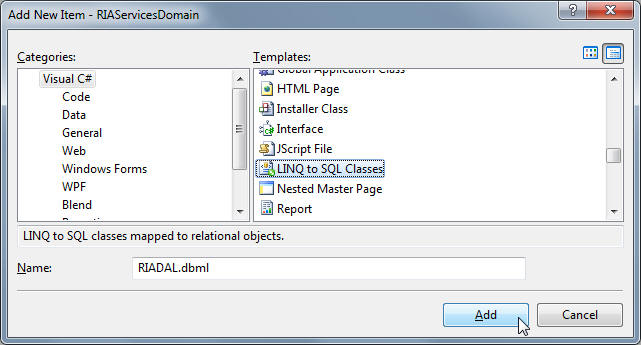
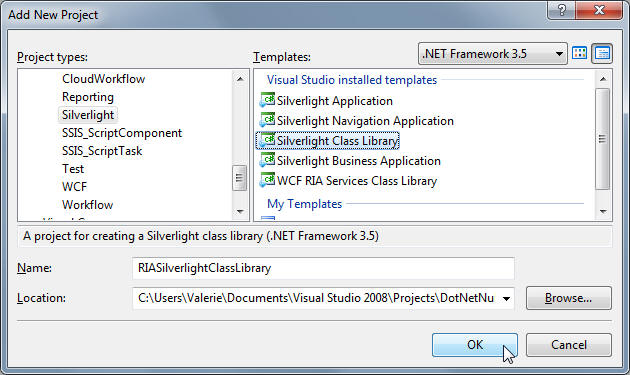
Right-click on the RIAServicesDomain project and select Add then New Item.
Create a Linq to SQL Class called RIADAL.dbml.
Open the Server Explorer.
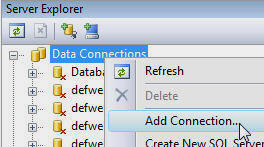
Add a connection to the DotNetNuke database.
![]()
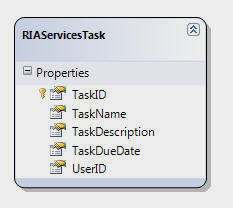
Drag and drop the RIAServicesTask table onto the design surface of the Linq to SQL DataContext class.
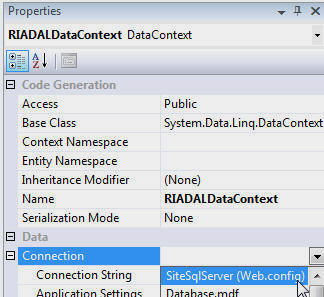
Set the Connection in the properties for the Linq to SQL class to SiteSQLServer (Web.config) (if the properties do not show, click anywhere in the whitespace on the design surface).
This will instruct the Linq to SQL DataContext class to look for the connection to the database in a key called SiteSqlServer in the Web.config.
This project will be compiled into an assembly (a .dll) and placed in the "bin" directory of the DotNetNuke website. When it runs, it will get the connection to the database from the SiteSqlServer key in the web.config of the DotNetNuke website.
Save and close the RIADAL.dbml file.
Build the Solution. This is very important for the next steps to work properly.
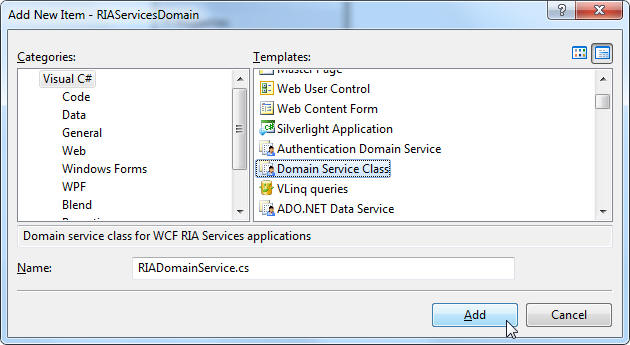
Right-click on the RIAServicesDomain project and select Add then New Item.
Create a Domain Service Class called RIADomainService.cs.
The Add New Domain Service Class box will come up. If you don't see the RIAServicesTask listed under Entities, close the box, rebuild the solution, and try again.
Check the check box next to RIAServicesTask and Enable editing and click OK.
Replace ALL the code in the RIADomainService.cs file with the following code:
namespace RIAServicesDomain
{
    using System;
    using System.Collections.Generic;
    using System.ComponentModel;
    using System.ComponentModel.DataAnnotations;
    using System.Data.Linq;
    using System.Linq;
    using System.Web.DomainServices;
    using System.Web.DomainServices.Providers;
    using System.Web.Ria;
    using System.Web.Ria.Services;
    using DotNetNuke.Entities.Users;
    using DotNetNuke.Entities.Portals;
    using System.Web;

    [EnableClientAccess()]
    public class RIADomainService : LinqToSqlDomainService<RIADALDataContext>
    {
        public IQueryable<RIAServicesTask> GetRIAServicesTasks()
        {
            // Get the current Portal
            PortalSettings objPortalSettings =
                (PortalSettings)HttpContext.Current.Items["PortalSettings"];
            // Get the current UserID
            UserInfo objUserInfo = UserController.GetUserByName(objPortalSettings.PortalId,
                this.ServiceContext.User.Identity.Name);

            var result = from RIAServicesTasks in this.DataContext.RIAServicesTasks
                         where RIAServicesTasks.UserID == objUserInfo.UserID
                         select RIAServicesTasks;

            return result;
        }

        public void InsertRIAServicesTask(RIAServicesTask rIAServicesTask)
        {
            // Get the current Portal
            PortalSettings objPortalSettings =
                (PortalSettings)HttpContext.Current.Items["PortalSettings"];
            // Get the current UserID
            UserInfo objUserInfo = UserController.GetUserByName(objPortalSettings.PortalId,
                this.ServiceContext.User.Identity.Name);

            rIAServicesTask.UserID = objUserInfo.UserID;
            this.DataContext.RIAServicesTasks.InsertOnSubmit(rIAServicesTask);
        }

        public void UpdateRIAServicesTask(RIAServicesTask currentRIAServicesTask)
        {
            this.DataContext.RIAServicesTasks.Attach(currentRIAServicesTask,
                this.ChangeSet.GetOriginal(currentRIAServicesTask));
        }

        public void DeleteRIAServicesTask(RIAServicesTask rIAServicesTask)
        {
            this.DataContext.RIAServicesTasks.Attach(rIAServicesTask);
            this.DataContext.RIAServicesTasks.DeleteOnSubmit(rIAServicesTask);
        }
    }
}
Save and close the file.
This code exposes 4 methods that will be consumed by the Silverlight application. It contains methods to Create, Read, Update, and Delete.
What we have done differently for DotNetNuke, is reference the DotNetNuke assembly and call a method to get the UserID of the currently logged in user and use that value in the GetRIAServicesTasks and InsertRIAServicesTask methods. This will only allow users to see Tasks that belong to them. When they insert a new Task, their UserID will be inserted into the record.
Build the Solution. This is very important.
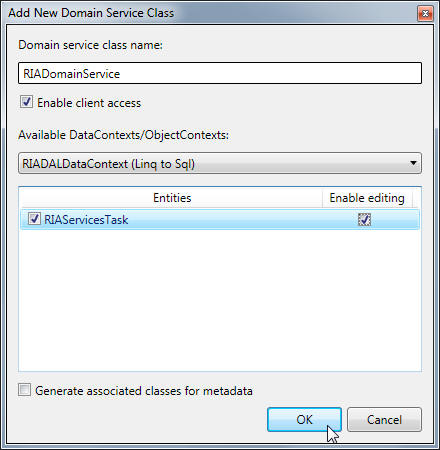
In Visual Studio, click on the root of the solution in the Solution Explorer. From the File menu, select Add, then New Project...
Create a Silverlight Class Library called RIASilverlightClassLibrary.
Click on the Class1.cs file and delete it.
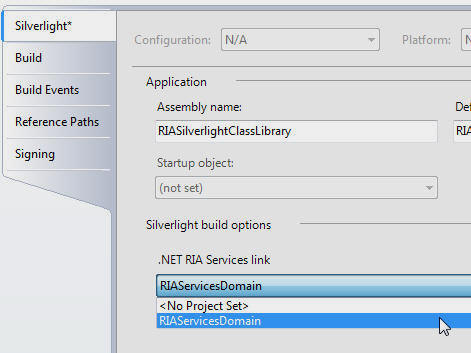
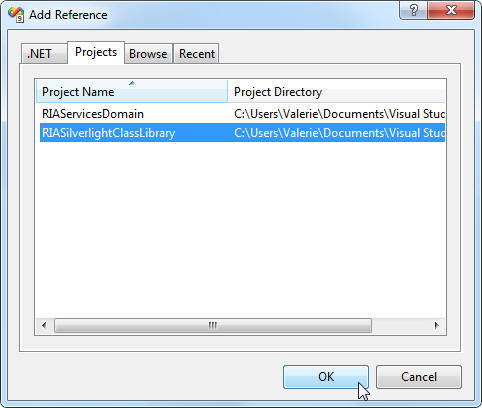
Right-click on the RIASilverlightClassLibrary project in the Solution Explorer and select Properties.
On the Silverlight tab, select RIAServicesDomain in the .NET RIA Services link (this may be called something else in later versions of WCF RIA Services). This simply instructs the Silverlight Class Library to create a RIA Services link to the RIAServicesDomain project.
The RIASilverlightClassLibrary project is only created because the Silverlight Application project (to be created in the next step), can only reference a Silverlight assembly from a Silverlight project. The RIASilverlightClassLibrary project is able to connect to the RIAServicesDomain and also be referenced by the Silverlight Application because it is a Silverlight project.
Close the Properties and Build the Solution. Again, this is very important.
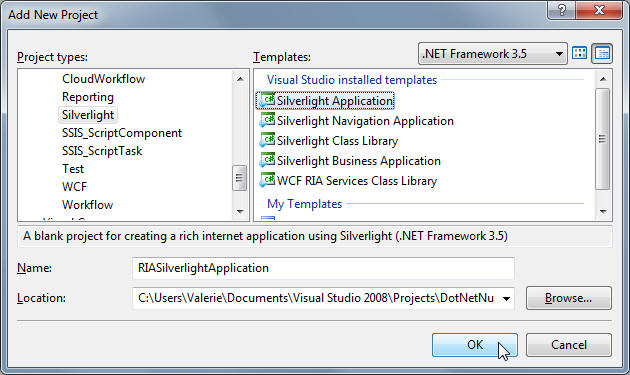
Click on the root of the solution in the Solution Explorer. From the File menu, select Add, then New Project...
Create a Silverlight Application called RIASilverlightApplication.
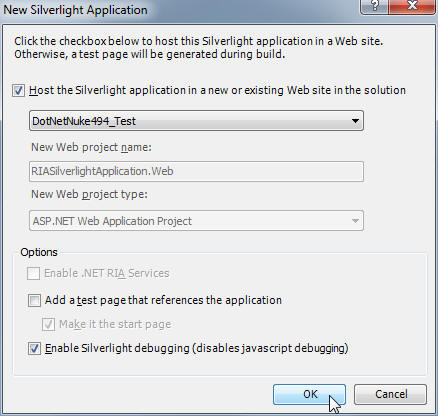
When the New Silverlight Application box comes up, Select the DotNetNuke website as the Host and click OK.
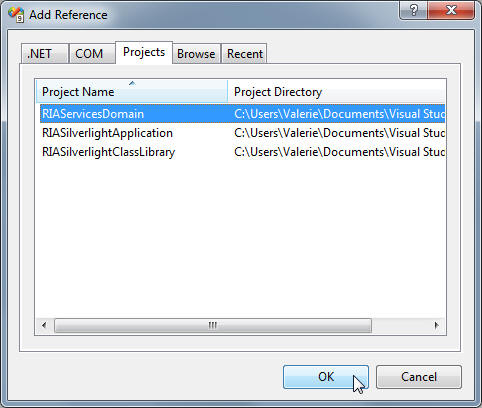
Right-Click on the RIASilverlightApplication project in the Solution Explorer, and add a Reference to the following libraries:
System.ComponentModel.DataAnnotations
System.Runtime.Serialization
System.ServiceModel
System.Windows.Controls
System.Windows.Controls.Data
System.Windows.Controls.Data.DataForm.Toolkit
System.Windows.Controls.Ria
System.Windows.Controls.Toolkit
System.Windows.Data
System.Windows.Ria
Also, add a reference to the RIASilverlightClassLibrary.
Open the MainPage.xaml in source mode and replace ALL the code with the following code:
<UserControl x:Class="RIASilverlightApplication.MainPage"
 xmlns="http://schemas.microsoft.com/winfx/2006/xaml/presentation"
 xmlns:x="http://schemas.microsoft.com/winfx/2006/xaml"
 xmlns:d="http://schemas.microsoft.com/expression/blend/2008"
 xmlns:mc="http://schemas.openxmlformats.org/markup-compatibility/2006"
 mc:Ignorable="d"
 xmlns:data="clr-namespace:System.Windows.Controls;assembly=System.Windows.Controls.Data"
 xmlns:riaControls="clr-namespace:System.Windows.Controls;assembly=System.Windows.Controls.Ria"
 xmlns:my="clr-namespace:RIAServicesDomain;assembly=RIASilverlightClassLibrary"
 xmlns:controls="clr-namespace:System.Windows.Controls;assembly=System.Windows.Controls"
 xmlns:controlsToolkit="clr-namespace:System.Windows.Controls;assembly=System.Windows.Controls.Toolkit"
 xmlns:dataFormToolkit="clr-namespace:System.Windows.Controls;assembly=System.Windows.Controls.Data.DataForm.Toolkit"
 d:DesignWidth="350" Width="400" Height="461">
    <Grid x:Name="LayoutRoot">
        <Grid.RowDefinitions>
            <RowDefinition />
            <RowDefinition Height="27" />
            <RowDefinition Height="264"/>
        </Grid.RowDefinitions>
        <riaControls:DomainDataSource AutoLoad="True"
                                      Height="0"
                                      LoadedData="RIADomain_LoadedData"
                                      x:Name="RIADomainDatasource"
                                      QueryName="GetRIAServicesTasks"
                                      Width="0" Margin="200,144,200,143">
            <riaControls:DomainDataSource.DomainContext>
                <my:RIADomainContext />
            </riaControls:DomainDataSource.DomainContext>
        </riaControls:DomainDataSource>
        <data:DataGrid AutoGenerateColumns="False"
                       ItemsSource="{Binding Data, ElementName=RIADomainDatasource, Mode=TwoWay}"
                       x:Name="TasksDataGrid"
                       RowDetailsVisibilityMode="VisibleWhenSelected"
                       RowEditEnded="TasksDataGrid_RowEditEnded"
                       AreRowGroupHeadersFrozen="False" Height="170" VerticalAlignment="Top">
            <data:DataGrid.Columns>
                <data:DataGridTextColumn
      Binding="{Binding TaskName}"
      Header="Task Name" />
                <data:DataGridTextColumn
      Binding="{Binding TaskDescription}"
      Header="Task Description" />
                <data:DataGridTemplateColumn x:Name="TaskDueDate"
                                             Header="Task Due Date"
                                             Width="200">
                    <data:DataGridTemplateColumn.CellTemplate>
                        <DataTemplate>
                            <controls:DatePicker
                            SelectedDate="{Binding Path=TaskDueDate, Mode=TwoWay,
                            ValidatesOnExceptions=true, NotifyOnValidationError=true}" />
                        </DataTemplate>
                    </data:DataGridTemplateColumn.CellTemplate>
                </data:DataGridTemplateColumn>
            </data:DataGrid.Columns>
        </data:DataGrid>
        <data:DataPager Grid.Row="1"
                        x:Name="dataPager1"
                        Source="{Binding Data, ElementName=RIADomainDatasource}" PageSize="5"
                         Margin="0,0,0,2" Height="25" VerticalAlignment="Bottom" />

        <dataFormToolkit:DataForm x:Name="TasksDataForm" Margin="7,17,8,46" Grid.Row="2"
         CommandButtonsVisibility="All"
         AutoCommit="False" ItemsSource="{Binding Data, ElementName=RIADomainDatasource, Mode=TwoWay}"
          AutoGenerateFields="False" EditEnded="TasksDataForm_EditEnded"
          CurrentItemChanged="TasksDataForm_CurrentItemChanged" DeletingItem="TasksDataForm_DeletingItem">
            <dataFormToolkit:DataForm.EditTemplate>
                <DataTemplate>
                    <StackPanel>
                        <dataFormToolkit:DataField Label="Task Name">
                            <TextBox Text="{Binding TaskName, Mode=TwoWay}" />
                        </dataFormToolkit:DataField>
                        <dataFormToolkit:DataField Label="Task Description">
                            <TextBox Text="{Binding TaskDescription, Mode=TwoWay}" />
                        </dataFormToolkit:DataField>
                        <dataFormToolkit:DataField Label="Task Due Date">
                            <controls:DatePicker SelectedDate="{Binding Path=TaskDueDate,
                            Mode=TwoWay, ValidatesOnExceptions=true, NotifyOnValidationError=true}" />
                        </dataFormToolkit:DataField>
                    </StackPanel>
                </DataTemplate>
            </dataFormToolkit:DataForm.EditTemplate>
        </dataFormToolkit:DataForm>
    </Grid>
</UserControl>
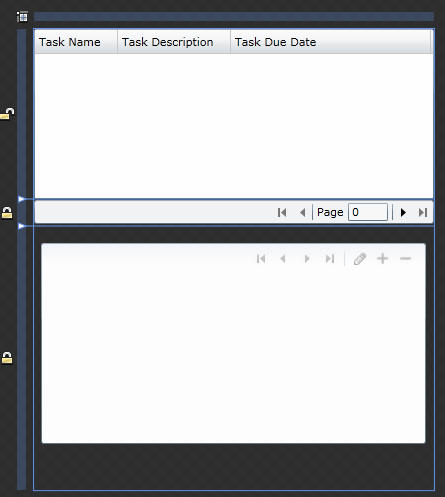
(the layout shown in Microsoft Expression Blend)
What we have just created:
Open the MainPage.xaml.cs and replace ALL the code with the following code:
using System;
using System.Windows.Controls;

namespace RIASilverlightApplication
{
    public partial class MainPage : UserControl
    {
        bool _isDeleting = false;
        public MainPage()
        {
            InitializeComponent();
        }

        #region RIADomain_LoadedData
        private void RIADomain_LoadedData(object sender,
            LoadedDataEventArgs e)
        {
            if (e.HasError)
            {
                System.Windows.MessageBox.Show(e.Error.ToString(), "Load Error",
                    System.Windows.MessageBoxButton.OK);
                e.MarkErrorAsHandled();
            }
        }
        #endregion

        #region TasksDataGrid_RowEditEnded
        private void TasksDataGrid_RowEditEnded(object sender,
            DataGridRowEditEndedEventArgs e)
        {
            // Updates the datasource if there have been any changes
            if (RIADomainDatasource.HasChanges)
            {
                RIADomainDatasource.SubmitChanges();
            }
        }
        #endregion

        #region TasksDataForm_EditEnded
        private void TasksDataForm_EditEnded(object sender,
            DataFormEditEndedEventArgs e)
        {
            // Updates the datasource if there have been any changes
            if (RIADomainDatasource.HasChanges)
            {
                RIADomainDatasource.SubmitChanges();
            }
        }
        #endregion

        #region TasksDataForm_CurrentItemChanged
        private void TasksDataForm_CurrentItemChanged(object sender, EventArgs e)
        {
            // Only try to update if in deleting mode
            if (_isDeleting)
            {
                // Updates the datasource if there have been any changes
                if (RIADomainDatasource.HasChanges)
                {
                    RIADomainDatasource.SubmitChanges();
                }
                _isDeleting = false;
            }
        }
        #endregion

        #region TasksDataForm_DeletingItem
        private void TasksDataForm_DeletingItem(object sender,
            System.ComponentModel.CancelEventArgs e)
        {
            // Mark _isDeleting as True so it can be
            // handled in TasksDataForm_CurrentItemChanged
            _isDeleting = true;
        }
        #endregion
    }
}
What we have just created:
Build the Solution.
In the DotNetNuke website project, add a reference to the RIAServicesDomain project. When the Silverlight application launches, it will contact the DotNetNuke website through WCF RIA Services and the DotNetNuke website will use the RIAServicesDomain assembly to respond.
Note: when the Linq to SQL DataContext inside the RIAServicesDomain project attempts to connect to the database, it will look for the database connection in the SiteSqlServer key that is in the Web.config file of the DotNetNuke website.
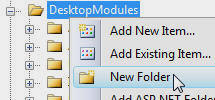
In the DotNetNuke website, in the Solution Explorer, right-click on the DesktopModules folder and select New Folder. Name the folder RIAServices.
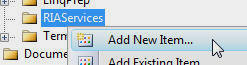
Right-click on the RIAServices folder and select Add New Item...
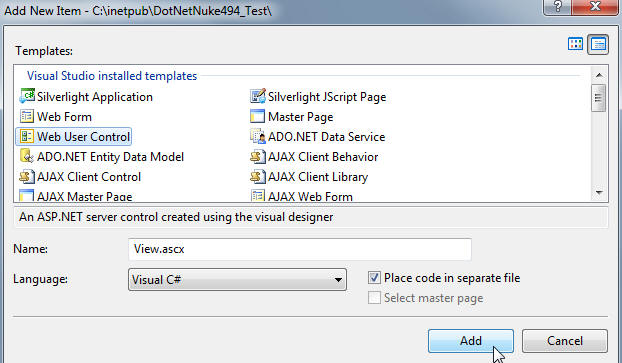
From the Add New Item box, select the Web User Control template, enter View.ascx for the Name, select Visual C# for the Language, and check the box next to Place code in separate file.
When the View.ascx page opens, replace ALL the code with the following code:
<%@ Control Language="C#" AutoEventWireup="true" CodeFile="View.ascx.cs" Inherits="RIAServices.View" %>

<script type="text/javascript">
    function onSilverlightError(sender, args) {
        var appSource = "";
        if (sender != null && sender != 0) {
            appSource = sender.getHost().Source;
        }

        var errorType = args.ErrorType;
        var iErrorCode = args.ErrorCode;

        if (errorType == "ImageError" || errorType == "MediaError") {
            return;
        }

        var errMsg = "Unhandled Error in Silverlight Application " + appSource + "\n";

        errMsg += "Code: " + iErrorCode + "    \n";
        errMsg += "Category: " + errorType + "       \n";
        errMsg += "Message: " + args.ErrorMessage + "     \n";

        if (errorType == "ParserError") {
            errMsg += "File: " + args.xamlFile + "     \n";
            errMsg += "Line: " + args.lineNumber + "     \n";
            errMsg += "Position: " + args.charPosition + "     \n";
        }
        else if (errorType == "RuntimeError") {
            if (args.lineNumber != 0) {
                errMsg += "Line: " + args.lineNumber + "     \n";
                errMsg += "Position: " + args.charPosition + "     \n";
            }
            errMsg += "MethodName: " + args.methodName + "     \n";
        }

        throw new Error(errMsg);
    }
</script>

<asp:Panel ID="silverlightControlHost" align="center" runat="server" HorizontalAlign="Left">
    <object data="data:application/x-silverlight-2," type="application/x-silverlight-2"
        style="height: 600px; width: 900px">
        <param name="source" value="<%=SilverlightApplication %>" />
        <param name="onError" value="onSilverlightError" />
        <param name="minRuntimeVersion" value="3.0.40624.0" />
        <param name="autoUpgrade" value="true" />
        <a href="http://go.microsoft.com/fwlink/?LinkID=149156&v=3.0.40624.0" style="text-decoration: none">
            <img src="http://go.microsoft.com/fwlink/?LinkId=108181" alt="Get Microsoft Silverlight"
                style="border-style: none" />
        </a>
    </object>
    <iframe id="_sl_historyFrame" style="visibility: hidden; height: 0px; width: 0px;
        border: 0px"></iframe>
</asp:Panel>
Open the View.ascx.cs file and, replace ALL the code with the following code:
using System;
using System.Web.UI;

namespace RIAServices
{
    public partial class View : DotNetNuke.Entities.Modules.PortalModuleBase
    {
        public string SilverlightApplication { get; set; }

        protected void Page_Load(object sender, EventArgs e)
        {
            // Register Silverlight.js file
            Page.ClientScript.RegisterClientScriptInclude(this.GetType(), "SilverlightJS",
                (this.TemplateSourceDirectory + "/Silverlight.js"));

            // Set the path to the .xap file
            SilverlightApplication = String.Format("{0}{1}", TemplateSourceDirectory,
                "/ClientBin/RIASilverlightApplication.xap");

            // Don't show panel if not logged in
            silverlightControlHost.Visible = (UserId > -1);
        }
    }
}
Download the Silverlight.js (right-click and download from this link) and place it in the RIAServices folder.
 |
TO | 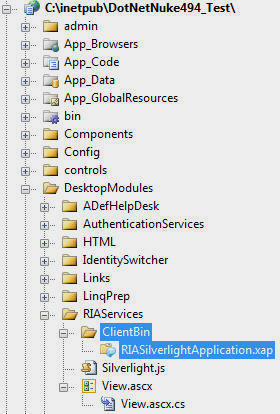 |
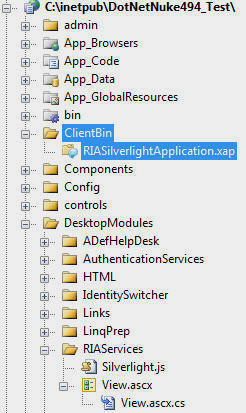
In the Solution Explorer, drag the ClientBin folder so that it is under the DesktopModules/RIAServices directory.
Add the following key to the <httpModules> section Web.config file in the DotNetNuke website:
<add name="DomainServiceModule" type="System.Web.Ria.Services.DomainServiceHttpModule,
System.Web.Ria, Version=2.0.0.0, Culture=neutral, PublicKeyToken=31BF3856AD364E35" />
Add the following key to the <system.serviceModel> section Web.config file in the DotNetNuke website (if it does not already exist):
<serviceHostingEnvironment aspNetCompatibilityEnabled="true">
</serviceHostingEnvironment>
Save and close the Web.config file.
In Visual Studio, hit the F5 button to launch the website.
If it does not start up properly, ensure that the DotNetNuke website is set as the Startup Project and the Default.aspx page in the DotNetNuke website is set as the Start page.
The following directions describe how to set-up a module definition on a DotNetNuke 4 website. For directions on a DotNetNuke 5 website, see the end of the tutorial this link.
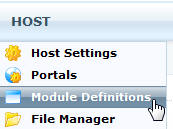
While logged into your DotNetNuke site as "host", in the web browser, from the menu bar select "Host". Then select "Module Definitions".
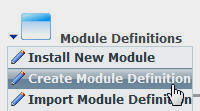
Select Create Module Definition.
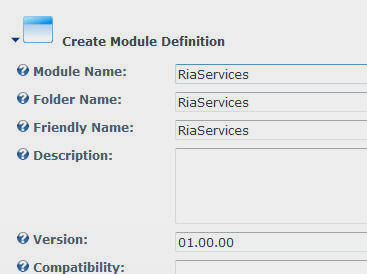
In the Create Module Definition menu:
Then click Create

Enter RiaServices for NEW DEFINITION, then click Add Definition

Next, click Add Control
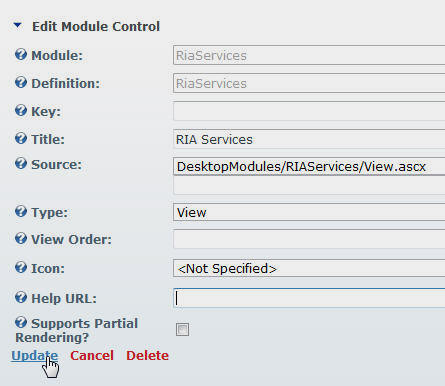
In the Edit Module Control menu:
Then click UPDATE
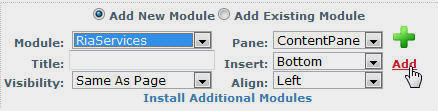
Place the module on a blank page in your DotNetNuke website.
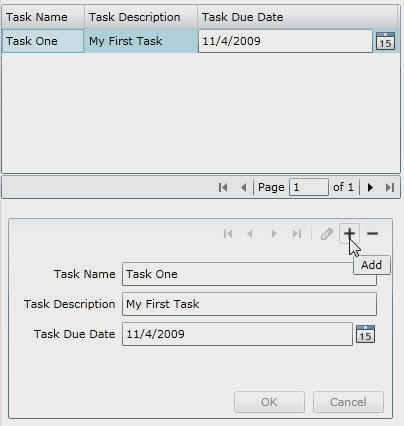
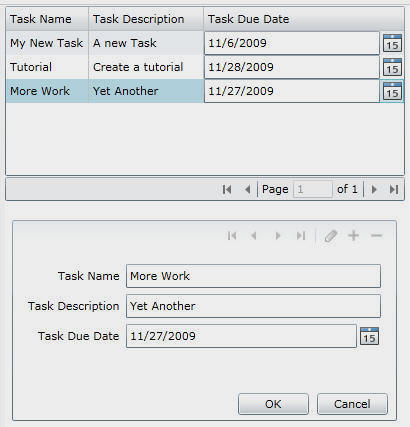
The module will only work if you are logged in as a registered user. You can click on the "+" to add a new Task, and "-" to delete a Task.