[Back]
Title:       Silverlight Gantt Chart
Author:      Michael Washington
Email:
Member ID:
Language:    C#
Platform:    Windows, .NET 3.5 e
Technology:  ASP.NET, Silverlight
Level:       Beginner, Intermediate, Advanced
Description: An example of a Gantt chart implemented in Silverlight 2.0
Section      ASP.NET
SubSection   Silverlight
License:     MIT
Live example: http://www.adefwebserver.com/DotNetNukeHELP/Misc/Silverlight/GanttChart/
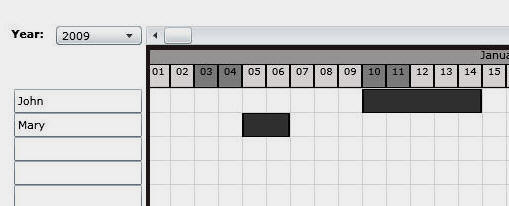
This project demonstrates implementing a Gantt Chart functionality in Silverlight. The primary purpose is to allow a user to quickly and easily enter data that relates two elements. In this example, the two elements are date and person, however, the code can be adapted for other relations.
This Silverlight project is not a full featured Gantt Chart such as Microsoft Project. It demonstrates only the most basic functionality and is provided as a starting point for your own projects.
The features it includes are:
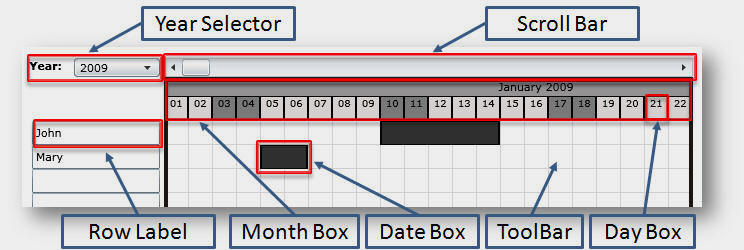
The Silverlight Gantt Chart is made up of the following elements:
When the Silverlight Gantt Control loads it creates some default data:
        #region CreateDefaultData
        private void CreateDefaultData()
        {
            colDateBoxAllYears = new List();
            DateBox objDateBox = new DateBox(3, Convert.ToDateTime("1/10/2009"), Convert.ToDateTime("1/14/2009"));
            colDateBoxAllYears.Add(objDateBox);
            DateBox objDateBox2 = new DateBox(4, Convert.ToDateTime("1/5/2009"), Convert.ToDateTime("1/6/2009"));
            colDateBoxAllYears.Add(objDateBox2);
        }
        #endregion
It instantiates two DateBox controls, passing the row and the "Start Date" and the "End Date". It then adds these to a Generic List called colDateBoxAllYears.
        #region DisplayYear
        private void DisplayYear(string strYear)
        {
            ToolBar.Children.Clear();
            List colDatePlannerMonths = DatePlannerMonth.GetMonths(strYear);

            double StartPosition = (double)0;
            foreach (DatePlannerMonth objDatePlannerMonth in colDatePlannerMonths)
            {
                AddMonthToToolbar(objDatePlannerMonth, strYear, StartPosition);
                StartPosition = StartPosition + objDatePlannerMonth.MonthWidth;
            }
            DisplayGridlines();
            LoadEventsForYear();
        }
        #endregion
This collection is used when the DisplayYear method is called. This method adds the months and the days for the current year to the ToolBar (the Grid). It also adds the grid lines and any dates for the current year that are in the colDateBoxAllYears collection.
        #region UpdateToolBarPosition
        private void UpdateToolBarPosition(Point Point)
        {
            double dCurrentPosition = (Point.X - StartingDragPoint.X);
            if ((dCurrentPosition < 0) & (dCurrentPosition > -8234))
            {
                Canvas.SetLeft(ToolBar, Point.X - StartingDragPoint.X);
                ctlScrollBar.Value = dCurrentPosition * -1;
            }
        }
        #endregion
The ToolBar is moved by altering it's Canvas.SetLeft postion. ctlScrollBar.Value moves the ScrollBar control position so that it stays in sync with the ToolBar.
![]()
The ScrollBar control moves the ToolBar using the following code:
        #region ctlScrollBar_Scroll
        private void ctlScrollBar_Scroll(object sender, System.Windows.Controls.Primitives.ScrollEventArgs e)
        {
            Point Point = new Point(e.NewValue, 0);
            Canvas.SetLeft(ToolBar, Point.X * -1);
        }
        #endregion

The MonthBox control is primarily composed of a Silverlight StackPanel control with 31 DayBox controls. When each month control is created, it is sized to only show the correct amount of days for the month it represents.
        #region GetMonthWidth
        private static double GetMonthWidth(DateTime dtMonthYear)
        {
            // 31 days is 744
            double dWidth = 744;
            // Get the days in the Month
            int intDaysInMonth = DateTime.DaysInMonth(dtMonthYear.Year, dtMonthYear.Month);
            // Determine the difference between 31 and the current days in the Month
            int intDaysToSubtract = (31 - intDaysInMonth);
            // If there is a difference subtract the days
            if (intDaysToSubtract > 0)
            {
                // The Width of each day is 24
                // Subtract 24 for each day
                dWidth = dWidth - (24 * intDaysToSubtract);
            }
            return dWidth;
        }
        #endregion
The ASP.NET DateTime.DaysInMonth method will automatically handle complex calculations such as leap years.
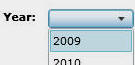
When the year is changed the following code executes:
        #region dlYear_SelectionChanged
        private void dlYear_SelectionChanged(object sender, SelectionChangedEventArgs e)
        {
            if (colDateBoxAllYears != null)
            {
                // Get all the entries in the DateBox collections that are not in the current Year
                List colDateBoxNotCurrentYear = colDateBoxAllYears.AsEnumerable().Where(x => x.DayBoxStart.Year != dtCurrentYear.Year).Cast().ToList();

                // Get all the DateBoxes in the Toolbar canvas (The current year)
                List colDateBoxCurrentYear = ToolBar.Children.AsEnumerable().Where(x => x.GetType().Name == "DateBox").Cast().ToList();

                // Build final collection
                colDateBoxAllYears = new List();
                foreach (DateBox objDateBox in colDateBoxNotCurrentYear)
                {
                    colDateBoxAllYears.Add(objDateBox);
                }
                foreach (DateBox objDateBox in colDateBoxCurrentYear)
                {
                    colDateBoxAllYears.Add(objDateBox);
                }

                // Set the current year
                dtCurrentYear = Convert.ToDateTime(String.Format("1/1/{0}", GetSelectedYear()));
                DisplayYear(GetSelectedYear());
            }
        }
        #endregion
The code uses Linq to get all the DateBox controls in the colDateBoxAllYears collection that are not for the current year, it then uses Linq to get the DateBox controls that are on the ToolBar (these are the boxes for the current year).

It then combines the two to build a final collection. This is saved in the ccolDateBoxAllYears collection and the newly selected year is then displayed.
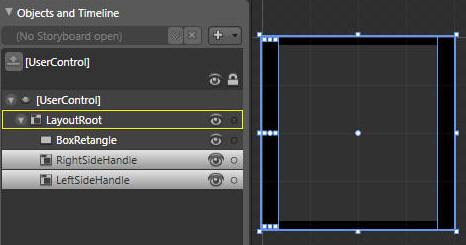
The DateBox control is used to indicate the dates selected on the ToolBar. It is composed of a Silverlight Rectangle with a Silverlight Canvas on the left side and the right site. The left and right side Canvases are used to determine when a user is trying to drag the control wider or smaller.
        public DateBox(int parmBoxRow, DateTime parmDayBoxStart, DateTime parmDayBoxStop)
        {
            // Required to initialize variables
            InitializeComponent();

            _BoxRow = parmBoxRow;
            _DayBoxStart = parmDayBoxStart;
            _DayBoxStop = parmDayBoxStop;

            TimeSpan tsBoxDaysDifference = _DayBoxStop - _DayBoxStart;
            int intBoxDays = tsBoxDaysDifference.Days;
            this.BoxSize = (intBoxDays * 24) + 24;
            SetToolTip();
        }
When the control is instantiated, the current row and start and stop dates are saved and the width of the box is set based on the amount of days.
        #region SetToolTip
        private void SetToolTip()
        {
            ToolTipService.SetToolTip(BoxRetangle, String.Format("{0} - {1}",
                    _DayBoxStart.ToShortDateString(),
                    _DayBoxStop.ToShortDateString()));

            ToolTipService.SetToolTip(LeftSideHandle, String.Format("{0} - {1}",
                _DayBoxStart.ToShortDateString(),
                _DayBoxStop.ToShortDateString()));

            ToolTipService.SetToolTip(RightSideHandle, String.Format("{0} - {1}",
                _DayBoxStart.ToShortDateString(),
                _DayBoxStop.ToShortDateString()));
        }
        #endregion
It also uses the ToolTipService object to create the display that shows the dates for the DateBox when the user hovers the mouse over the elements.
private void LeftButton_MouseLeftButtonDown(object sender, MouseButtonEventArgs e)
        {
            // Get current Mouse position
            Point tmpPoint = e.GetPosition(null);
            // Build a list of elements at the current mouse position
            List hits =
                (List)System.Windows.Media.VisualTreeHelper
                .FindElementsInHostCoordinates(tmpPoint, this);
            // Get all the DateBoxes in the Toolbar canvas
            List colDateBox = ToolBar.Children.AsEnumerable()
                .Where(x => x.GetType().Name == "DateBox").Cast().ToList();
            // Loop through all the DateBoxes in the Toolbar canvas
            foreach (DateBox objDateBox in colDateBox)
            {
                if (hits.Contains(objDateBox))
                {
                    Point DateBoxPoint = e.GetPosition(objDateBox);
                    TimeSpan tsBoxDays = objDateBox.DayBoxStop - objDateBox.DayBoxStart;
                    if (DateBoxPoint.X <= 2 || (DateBoxPoint.X >= ((tsBoxDays.Days + 1) * 24) - 2))
                    {
                        // Set the objResizingDateBox to the current datebox so that it will be
                        // resized when the mouse button is released
                        objResizingDateBox = objDateBox;
                        StartingCanvasDragPoint = GetMousePosition(ToolBar, e);

                        // Save the side that is being resized
                        //strResizingDateBoxSide
                        if (DateBoxPoint.X <= 2)
                        {
                            strResizingDateBoxSide = ''Left'';
                        }
                        else
                        {
                            strResizingDateBoxSide = ''Right'';
                        }
                    }
                    else
                    {
                        // The center of the DateBox was clicked. Show the Popup
                        ShowPopup(objDateBox);
                        return;
                    }
                }
            }
When the user clicks on the ToolBar, the FindElementsInHostCoordinates
method is used to find all elements that are at the present mouse position. Note, the
horizontal and vertical gridlines have IsHitTestVisible="false"
to improve performance (it means they will be ignored).
If an existing DateBox is detected, the code checks to see if
one of the sides of the DateBox is detected because that would indicate the user
wishes to drag the DateBox wider or smaller.
               // If the mouse did not move - Place a box on the grid
                if (CheckTolerance(StartingDragPoint, EndingDragPoint))
                {
                    Point objPoint = BoxClicked(EndingDragPoint);
                    InsertBox(objPoint, 0);
                }
When a user lifts the mouse button after clicking on the ToolBar and there are no other elements there, the CheckTolerance method is used to determine if the mouse moved more than 2 "points" in either direction.
        #region InsertBox
        private void InsertBox(Point objPoint, int intDays)
        {
            int intX = Convert.ToInt32(objPoint.X);
            int intY = Convert.ToInt32(objPoint.Y);

            // Find position for the Box
            Point boxPoint = new Point((intX * 24 - 24), (intY * 24 - 28));

            // Only place a box if row is higher than 2
            if (intY > 2)
            {
                DateBox objDateBox = new DateBox(intY, GetBoxDate(intX, GetSelectedYear()),
                    GetBoxDate(intX + intDays, GetSelectedYear()));
                Canvas.SetLeft(objDateBox, boxPoint.X);
                Canvas.SetTop(objDateBox, boxPoint.Y);

                ToolBar.Children.Add(objDateBox);
            }
        }
        #endregion
If the mouse did not move past the "tolerance", a new box is instantiated and added to the Toolbar using: ToolBar.Children.Add(objDateBox).
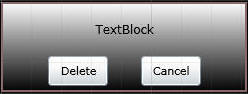
When the user clicks directly on a DateBox, the Popup control is used to display the date range of the DateBox and to allow the user the option to delete the DateBox.
        #region CreatePopup
        private void CreatePopup()
        {
            objDateBoxPopup = new Popup();
            objDateBoxPopup.Name = "DeletePopup";
            objDateBoxPopup.Child = new DateBoxPopup();
            objDateBoxPopup.SetValue(Canvas.LeftProperty, 150d);
            objDateBoxPopup.SetValue(Canvas.TopProperty, 150d);
            objDateBoxPopup.HorizontalOffset = 25;
            objDateBoxPopup.VerticalOffset = 25;
            ToolBarWindow.Children.Add(objDateBoxPopup);
            objDateBoxPopup.IsOpen = false;
        }
        #endregion
When the Silverlight Gantt Chart first loads, a Popup is created and a DateBoxPopup control is placed inside it.
        #region ShowPopup
        private void ShowPopup(DateBox objDateBox)
        {
            if (objDateBoxPopup.IsOpen == false)
            {
                objDateBoxPopup.CaptureMouse();
                DateBoxPopup GanttPopUpBox = (DateBoxPopup)objDateBoxPopup.FindName("GanttPopUpBox");
                GanttPopUpBox.objDateBox = objDateBox;
                objDateBoxPopup.IsOpen = true;
            }
        }
        #endregion
When the Popup needs to appear, a instance of the associated DateBox is set as a property of the DateBoxPopup control (that is contained in the Popup).
        #region btnDelete_Click
        private void btnDelete_Click(object sender, RoutedEventArgs e)
        {
            Canvas ToolBar = (Canvas)this.LayoutRoot.FindName("ToolBar");
            ToolBar.Children.Remove(_objDateBox);
            ClosePopup();
        }
        #endregion
If the Delete button is clicked, the DateBoxPopup control will already have an instance of the DateBox control so it can delete it by removing it from the ToolBar.
        #region ClosePopup
        private void ClosePopup()
        {
            Popup objPopup = (Popup)this.LayoutRoot.FindName("DeletePopup");
            objPopup.ReleaseMouseCapture();
            objPopup.IsOpen = false;
        }
        #endregion
When the Popup is "closed" it's IsOpen property is simply set to False.
The mouse is a very efficient input device. A user is able to move their hand and click much faster than they can usually type. A control such as a Gantt Chart allows the user to indicate two things at one time with a single mouse click. In this example the click represents:
However, you can adapt this code to represent other things such as:
Hopefully this control will save you time when implementing your own Gantt Chart functionality. Primarily it saves you time because it performs the necessary calculations to prevent DateBoxes from overlapping.
To save the data, simply save the colDateBoxAllYears collection. To load the data simply pass the colDateBoxAllYears collection to the control on start-up and the call the DisplayYear method.