Back To: Silverlight Tutorials (includes Silverlight 2.0)
Also see: Silverlight Control 2 (Silverlight 1.0) - This is an extended version of this tutorial. It demonstrates how to get a reference to the controls created so you can detect what was clicked and manipulate the object.
Various methods exists for creating Silverlight XAML objects. Many of these methods dynamically create XAML. The problem that arises is that this XAML cannot be edited with a designer such as Expression Blend. Justin-Josef Angel in "Silverlight Controls - The path to reusable XAML" describes a method to create XAML objects in a designer editable .xaml file that is paired with a JavaScript file that contains the methods for XAML object.
His article also implements other object oriented techniques that introduce a level of abstraction that may be difficult for those new to Silverlight development to follow. This tutorial contains a simplified implementation.
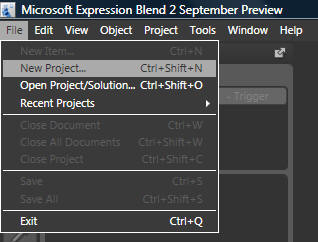
Using Expression Blend 2 (or higher) create a new project.
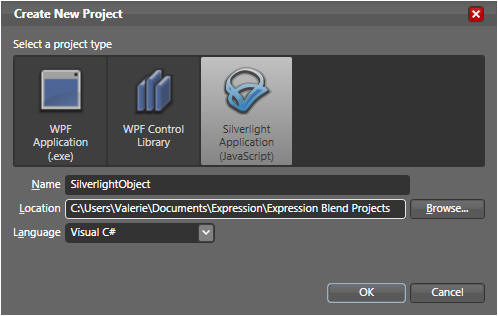
Create a JavaScript project.
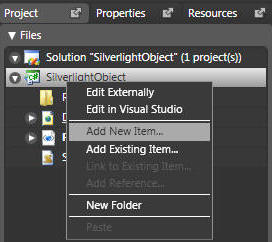
In the Project Explorer, right-click on the project and select "Add New Item...".
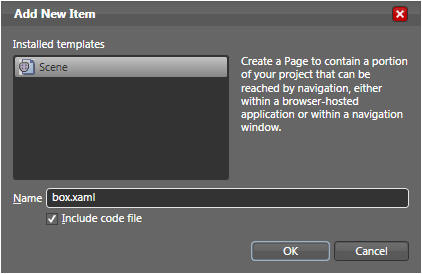
Select the Scene template and name it "box.xaml".
When the "box.xaml" file displays, switch to XAML view replace all the code with the following:
<Canvas
xmlns="http://schemas.microsoft.com/client/2007"
xmlns:x="http://schemas.microsoft.com/winfx/2006/xaml"
x:Name="box"
Width="100" Height="50">
<Canvas.Background>
<LinearGradientBrush
EndPoint="0.49,-0.342" StartPoint="0.49,1.662">
<GradientStop
Color="#FF000000" Offset="0"/>
<GradientStop
Color="#FF1C408C" Offset="0.99"/>
<GradientStop
Color="#FF334160" Offset="0.375"/>
<GradientStop
Color="#FFC1CADE" Offset="0.625"/>
</LinearGradientBrush>
</Canvas.Background>
<TextBlock x:Name="BoxTitle"
Width="50" Height="23" Text="test" TextWrapping="Wrap" Canvas.Left="33"
Canvas.Top="15"/>
</Canvas>
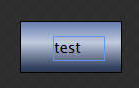
Switch to Design view to view the "box object".
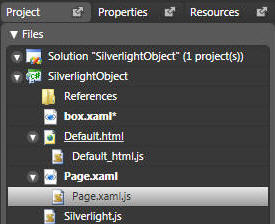
In the Project Explorer, click the right arrow next to "Page.xaml" to display the "Page.xaml.js" file. Double-click on the file to open it up in the configured editor. Replace all the code with the following code and then close the file (select save when prompted):
if (!window.SilverlightObject)
window.SilverlightObject = {};
SilverlightObject.Page = function()
{
}
SilverlightObject.Page.prototype =
{
handleLoad: function(control, userContext, rootElement)
{
// A loop that creates 5 instances of the "box"
object
// Each instance is passed the "rootElement", an ID that appends a number "box"
// and a position that is the multiplication of 40 times the current iteration
for(i = 0; i <= 4; i++)
{
new box("box" + i, rootElement, i * 40);
}
}
}
Next, double-click on the file to open it again. This time replace all the code with the following code:
// Michael Washington
// Silverlight Tutorials
// http://www.adefwebserver.com/DotNetNukeHELP/Misc/Silverlight/
// Adapted from Justin-Josef Angel's
// "Silverlight Controls - The path to reusable XAML"
// http://blogs.microsoft.co.il/blogs/justinangel/archive/2007/08/14/Silverlight-Controls-_2D00_-The-path-to-reusable-XAML.aspx
// This JavaScript file defines the object "box"
box = function(ID, Parent, XLocation)
{
this._ID = ID + "_";
this._parent = Parent;
this._XLocation = XLocation;
this._host = this._parent.getHost();
// The first step is to retrive the XAML content for the "box"
this.StartXamlDownload();
}
box.prototype =
{
_findNameByXamlID : function(nameInXamlFile)
{
return this._parent.findName(this._getIdFor(nameInXamlFile));
},
_getIdFor : function(nameInXamlFile)
{
return this._ID + nameInXamlFile;
},
StartXamlDownload : function()
{
// A Silverlight "downloader" object is used to retrieve the "box.xaml" file
that contains
// the XAML for the "box"
// A delegate is created that will call the "XamlDownloadCompleted" method when
the
// download is completed
var xamlDownloader = this._host.createObject("downloader");
xamlDownloader.open("GET", "box.xaml");
xamlDownloader.addEventListener("completed", Silverlight.createDelegate(this,
this.XamlDownloadCompleted));
xamlDownloader.send();
},
XamlDownloadCompleted : function(sender, eventArgs)
{
// The download of "box.xaml" has been completed
// "sender.ResponseText" contains the contents of "box.xaml"
var originalXaml = sender.ResponseText;
// In order to avoid name collisions, the name of each "box" object will be
replaced
// with a name that begins with the ID that was passed in the object constructor
originalXaml = originalXaml.replace(/Name="/g, "Name=\"" + this._ID);
// The "box" will now be added to the main Canvas
// "plugin" is a reference to the Silverlight control on the html page
var plugin = sender.getHost();
// The altered "box.xaml" is used to create a XAML object
var newElement = plugin.content.createFromXaml(originalXaml)
// "rootCanvas" is a reference to the main Silverlight Canvas
var rootCanvas = plugin.content.findName("Page");
// The XML object is added to the root Canvas
rootCanvas.children.add(newElement);
// Now that the "box" has been added to the main Canvas
// the "BoxTitle" will be altered and the "box" position will be set
this._setControlReferences();
},
_setControlReferences : function()
{
// This method sets the "BoxTitle" and the "box" position
this._BoxTitle = this._findNameByXamlID("BoxTitle");
this._BoxTitle.text = this._XLocation.toString();
this._box = this._findNameByXamlID("box");
this._box["Canvas.Left"] = this._XLocation;
this._box["Canvas.Top"] = this._XLocation + 10;
}
}
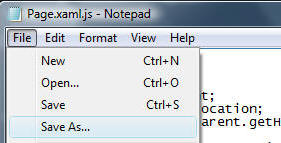
This time, select File, then "Save As...".
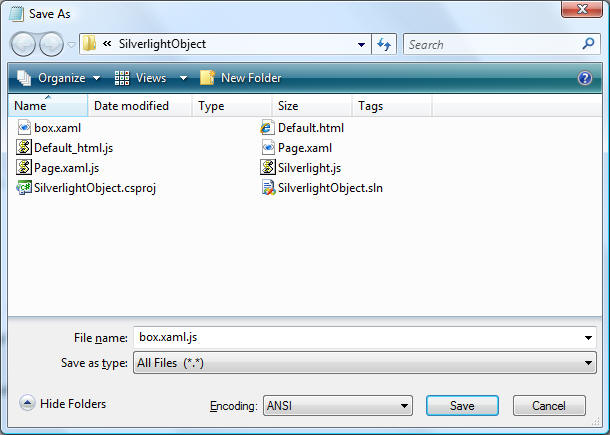
Save the file as "box.xaml.js".
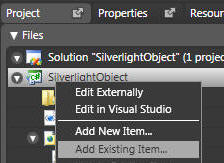
In the Project Explorer, right-click on the project and select "Add Existing Item...".
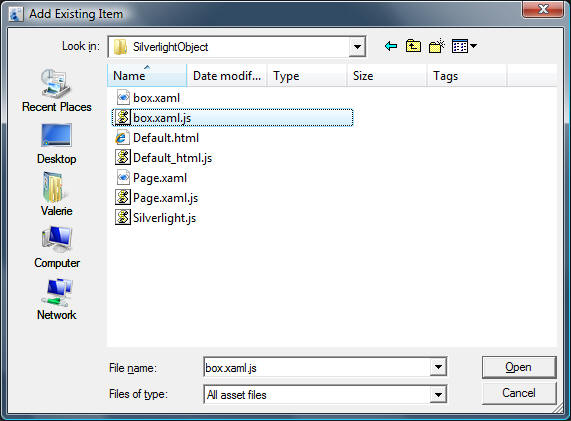
Select the "box.xaml.js" file and click Open.
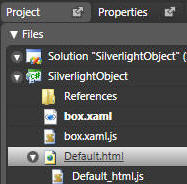
In the Project Explorer, double-click on Default.html to open it in the configured editor.
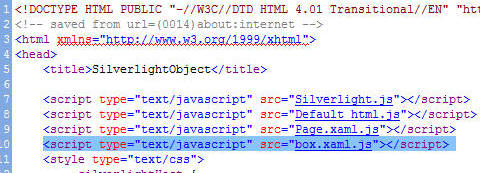
In the source of the Default.html file add the following line under "<script type="text/javascript" src="Page.xaml.js"></script>":
<script type="text/javascript" src="box.xaml.js"></script>
Save the file. In Expression Blend, press the F5 button to run the project.
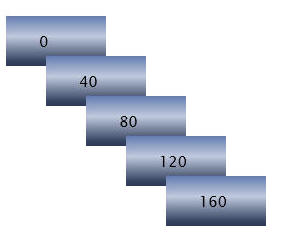
The results will now appear.
Download the complete source code here: SilverlightObject.zip
Back To: Silverlight Tutorials
Also See:
![]()