Back To: Silverlight Tutorials
This is an extended version of the Silverlight Control Tutorial. It demonstrates how to get a reference to the controls created so you can detect what was clicked and manipulate the object.
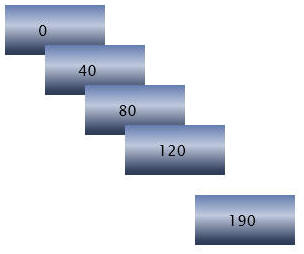
In this version, when you click anywhere on the box above the last box moves:
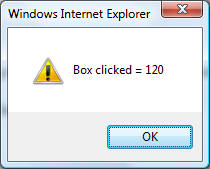
and when you click on a button you see the name of the button:
Let's say you needed 10 containers, each with a Image control so you could
display a picture.
With this pattern you would make only 1 container in the Container.xaml
file. The associated JavaScript file would be called Container.js
and define an object called Container. Then you place 10
instances of Container on your page. To add an image to each
Container you would set the image like this:
Container[1].Element.findName(“ImageControl”).Source
= “myImage.jpg”
This should save a lot of code because if the Containers are
created and set using a loop, you could create 100 Containers
with the same amount of code as you would need for just 1. Remember to use the
downloader object to retrieve any assets like images to ensure all assets are
available before trying to use them.
The code is exactly the same as the code in Silverlight Control Tutorial except for the changes noted below:
if (!window.ObjectTest)
window.ObjectTest = {};
ObjectTest.Page = function()
{
}
var objBox = new Array(5);
var CurrentLocation = 160;
ObjectTest.Page.prototype =
{
handleLoad: function(control, userContext, rootElement)
{
// create 5 instances of the "box" object
for(i = 0; i <= 4; i++)
{
objBox[i] = new box("box" + i,
rootElement, i * 40);
}
rootElement.addEventListener("MouseLeftButtonDown", Silverlight.createDelegate(this,
this.handleMouseDown));
},
handleMouseDown: function(sender, eventArgs)
{
//Move last Box
CurrentLocation = CurrentLocation + 10;
objBox[4]._BoxTitle.text = CurrentLocation.toString();
objBox[4].Element["Canvas.Left"] = CurrentLocation;
objBox[4].Element["Canvas.Top"] = CurrentLocation + 10;
}
}
// Michael Washington
// Silverlight Tutorials
// http://www.adefwebserver.com/DotNetNukeHELP/Misc/Silverlight/
// Adapted from Justin-Josef Angel's
// "Silverlight Controls - The path to reusable XAML"
// http://blogs.microsoft.co.il/blogs/justinangel/archive/2007/08/14/Silverlight-Controls-_2D00_-The-path-to-reusable-XAML.aspx
// This JavaScript file defines the object "box"
box = function(ID, Parent, XLocation)
{
this._ID = ID + "_";
this._parent = Parent;
this._XLocation = XLocation;
this._host = this._parent.getHost();
this.Element;
// The first step is to retrive the XAML content for
the "box"
this.StartXamlDownload();
}
box.prototype =
{
_findNameByXamlID : function(nameInXamlFile)
{
return this._parent.findName(this._getIdFor(nameInXamlFile));
},
_getIdFor : function(nameInXamlFile)
{
return this._ID + nameInXamlFile;
},
StartXamlDownload : function()
{
// A Silverlight "downloader"
object is used to retrieve the "box.xaml" file that contains
// the XAML for the "box"
// A delegate is created that will call the "XamlDownloadCompleted"
method when the
// download is completed
var xamlDownloader = this._host.createObject("downloader");
xamlDownloader.open("GET", "box.xaml");
xamlDownloader.addEventListener("completed",
Silverlight.createDelegate(this, this.XamlDownloadCompleted));
xamlDownloader.send();
},
XamlDownloadCompleted : function(sender, eventArgs)
{
// The download of "box.xaml" has
been completed
// "sender.ResponseText" contains the contents of "box.xaml"
var originalXaml = sender.ResponseText;
// In order to avoid name
collisions, the name of each "box" object will be replaced
// with a name that begins with the ID that was passed in the
object constructor
originalXaml = originalXaml.replace(/Name="/g, "Name=\"" +
this._ID);
// The altered "box.xaml" is used
to create a XAML object
var plugin = sender.getHost();
var newElement = plugin.content.createFromXaml(originalXaml)
// Set Element to the XAML object
so that it can be manipulated
this.Element = newElement;
// The "box" will now be added to
the main Canvas
// The XML object is added to the element passed in the
constructor
this._parent.children.add(newElement);
// Now that the "box" has been
added to the main Canvas
// the "BoxTitle" will be altered and the "box" position will
be set
this._setControlReferences();
},
_setControlReferences : function()
{
// This method sets the "BoxTitle"
and the "box" position
this._BoxTitle = this._findNameByXamlID("BoxTitle");
this._BoxTitle.text = this._XLocation.toString();
this._box = this._findNameByXamlID("box");
this._box["Canvas.Left"] = this._XLocation;
this._box["Canvas.Top"] = this._XLocation + 10;
this._box.addEventListener("MouseLeftButtonDown",
Silverlight.createDelegate(this, this.handleMouseDown));
},
handleMouseDown: function(sender, eventArgs)
{
alert("Box clicked = " + this._BoxTitle.text);
}
}
Download the complete source code here: ObjectTest2.zip
Back To: Silverlight Tutorials
Also See:
![]()